How to render something behind everything else in Unity
I'm working on a skybox in Unity, with a sun that moves to match the scene's main directional light. The style is blocky and inspired by Minecraft, so the sun needs to be square.
Note this post was written while working with version 2022.3.15f1 of the Unity editor, and using the universal render pipeline.
Option 1: Procedural skybox shader
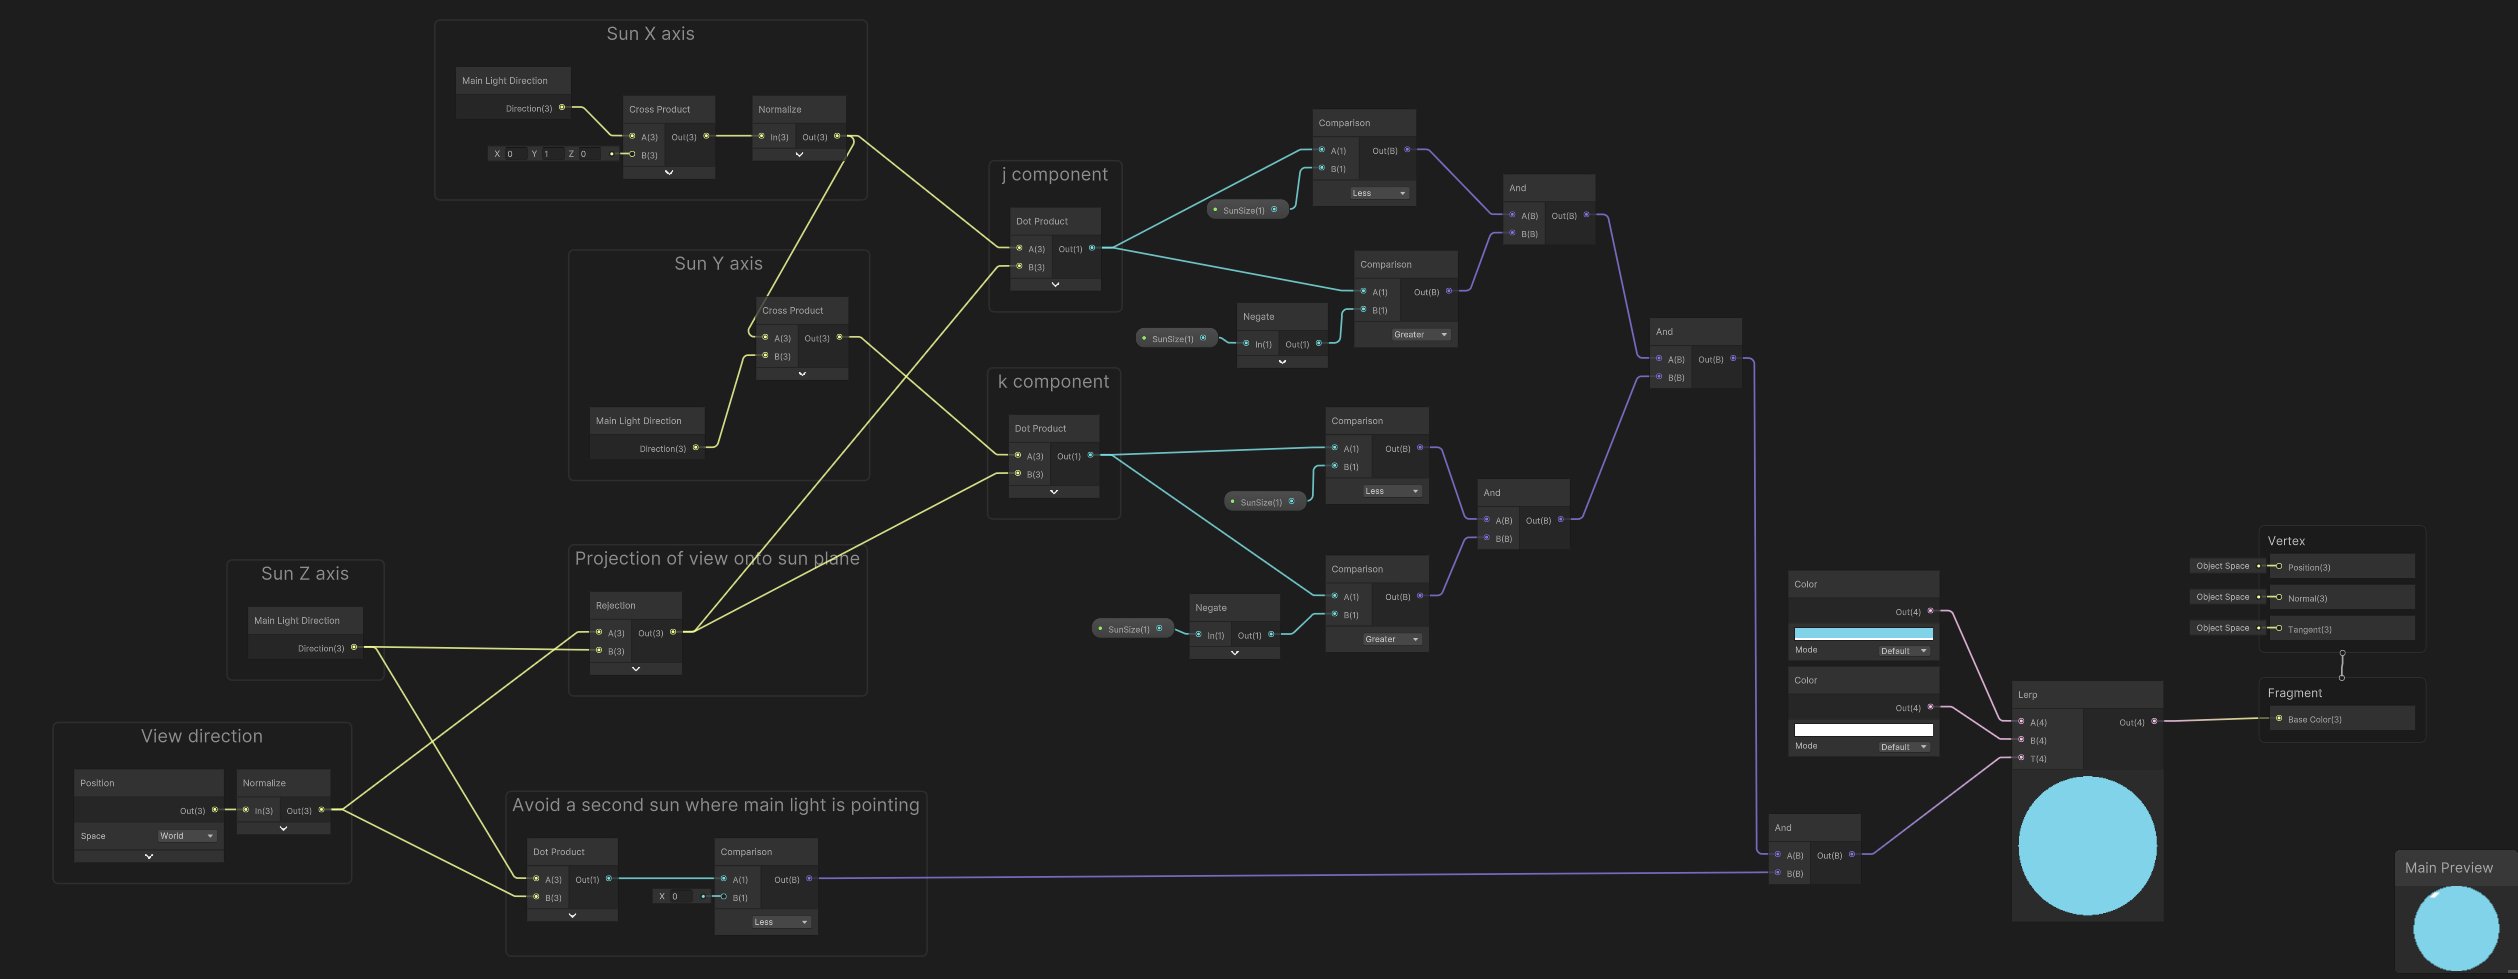
My first approach was to do it the same way as the procedural skybox - in the shader - so I created a new shader graph. I managed to make it work as the shader for the skybox material (set in environment tab of lighting settings window) after disabling "cast shadows" and setting depth write to "force disabled".
The basic idea behind a skybox shader is to use the normalized world position as the view direction, and using that to determine what each pixel in the far away sky should display.
I quickly realized however that even something as simple as drawing a square sun could be quite complex, requiring things like:
- With the main light's direction as the sun's Z axis, using cross product to determine its X and Y axes (using global Y as the up axis).
- Projecting view direction onto the sun's plane
- Displaying a "sun" pixel where projection is smaller than some threshold when decomposed into sun's X and Y axes
- Avoiding a second sun opposite to the main light by ignoring the case where view direction is pointing away from main light
Option 2: Camera stacking
Another option is to have a second camera that renders only skybox elements.
I decided to not go with this route for complexity and performance reasons. An additional camera adds a mental burden for someone interpreting the scene, and overdraw may also be impossible to avoid at the moment:

Option 3: Skybox objects on main camera
A reasonably elegant option seems to be having skybox elements - such as the sun - inside the scene, as regular objects (although placed somewhat far from the camera). They would also be rendered by the main camera, with no need for a multi camera setup.
Simply placing objects far away
To make these objects render behind everything else, one could simply physically place them behind everything else - only slightly less distant than the camera frustum's far plane.
This feels a little fragile however - I am not sure that some edge case wouldn't spring up when there are other objects near the camera's far frustum (which can be arbitrarily close), or that the skybox object itself wouldn't temporarily snap out of view.
So something special needs to be done in terms of rendering these objects.
z-buffer and render queues
My goal was thus to render something behind other all other objects regardless of its actual position in the world.
After reading up on the z-buffer, depth writing/checking, and render queues, I tried disabling depth writing and placing skybox objects on an earlier render queue.
This worked - but only after I disabled depth priming in the URP renderer settings. It seems there is some bug (or maybe just obscure behavior) with this feature.
There were a few issues however:
- Setting a skybox material in the lighting settings caused the skybox to be drawn over skybox objects (skybox is drawn between render queues 2500 and 2501, after all opaque objects have been drawn).
- Drawing skybox objects in an early render queue causes overdraw by ignoring whether their pixels will be covered up later. Ideally, we would make use of the z-buffer for this.
- I didn't want to have to disable depth priming. I'd prefer to still be able to enable it even if it was acting quirky.
URP "Render Objects" renderer feature
One can also go about these things with a renderer feature in URP called "Render Objects", which requires using a layer to treat some objects differently. It allows one to set z-buffer options, and to override the render queue in the form of choosing from a list of "events" (such as "after drawing skybox").
However, setting up skybox objects through a layer is harder to notice for people trying to make sense of the scene in the Unity editor - it can too easily go unnoticed. In comparison, a material and/or shader with a descriptive name is a more semantic & explicit way of doing it.
Drawing after the skybox
To avoid overdraw, it makes sense to draw skybox objects after the skybox itself, so we should place them in render queue 2501 (this was found empirically with some quick binary search). We keep it at 2501 because we still want other objects, such as those with transparency or alpha clipping, to render afterward.
The problem here is that skybox objects would also be drawn on top of other objects that are farther away from the camera (as regular objects would), due to the default depth testing setting of "less or equal". There is no option for a z-buffer test that would only draw on top of skybox pixels however, which also means we can't avoid running a fragment shader when the closest thing to the camera on a given pixel is one of our skybox objects.
What we can do is check the z-buffer in the fragment shader, and discard the result if there is something other than the skybox drawn on that pixel.
Discarding a pixel in shader graph can be done by enabling alpha clipping and setting an alpha value below the clipping threshold.
This is what I ended up with:
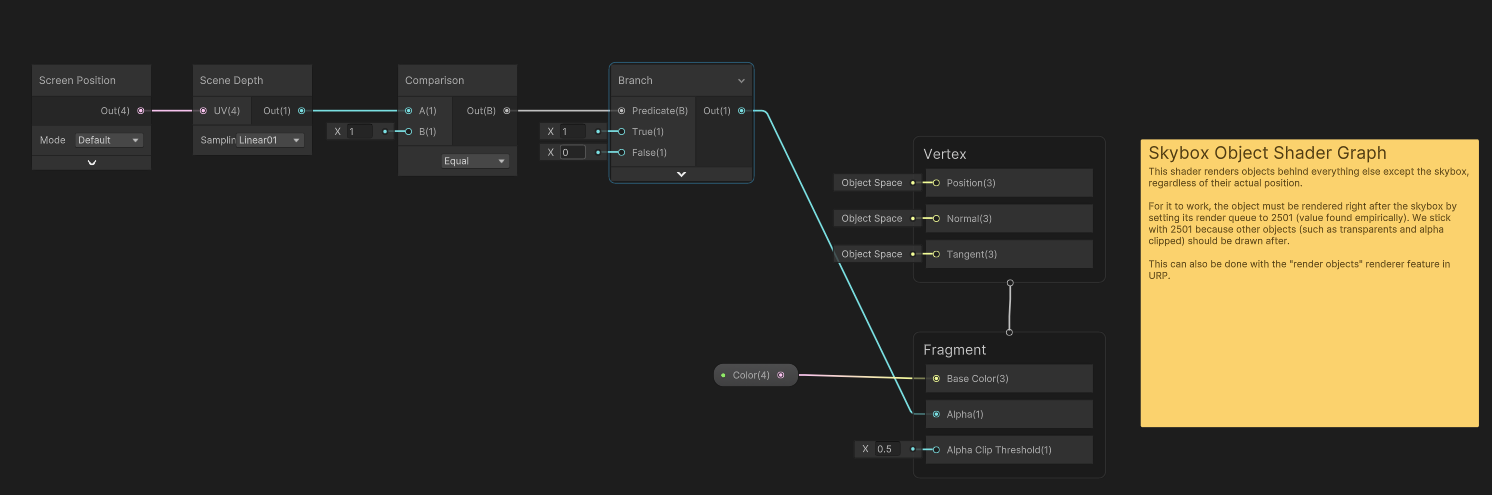
Note that depth writing still has to be disabled for the shader, or else objects on later render queues will not draw on top of it if they're behind it.
With this approach, depth priming can also be reenabled with no issues. This may be because depth priming only cares about opaque objects (on earlier render queues).
The shader is also quite simple, so things like texture sampling have to be added - replacing the small color input node in the screenshot.
And finally, note that (as mentioned before) the farther away a skybox object is from the camera, the less likely it will be in front of some opaque object and require running the fragment shader only to be discarded.
Placing skybox objects far from the camera is thus still a good idea for performance, just not absolutely required. It's good to know it's ok for something to be behind them, and that we don't have to push them to the camera frustum's far plane.
Why not transparent
Why can't we simply configure the shader to be transparent (render queue 3000) instead of setting a custom render queue (which has to be done on the material as it's not currently supported through shader graph)?
This doesn't work because transparent objects are drawn back to front, and thus skybox objects are rendered in front of any transparent objects behind them.
Note they aren't discarded by the shader because transparent objects don't write their depth to the z-buffer.
My approach
Now that we decided to have skybox objects as part of the scene, and rendered by the main camera (option 3), let's finalize the approach.
Billboarding
Skybox objects can be placed anywhere and may even move around (such as with day/night cycles), and should face the camera the whole time.
We could do this through script, but a shader may be marginally more performant, and it's good learning experience (and something we may reuse later).
We can only rely on the camera's position (the sun doesn't change when we )
The final touch
After taking care of the shader, the final step is to
- Billboard
- Move with camera